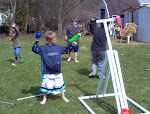
I put together this catapult in about an hour on the morning of my sons birthday party and it was a splash hit.
The kids had a ton of fun with the water balloon catapult,squirt guns and archery setup we had in place for the day.I am thinking of offering the use of this fine seige weapon to our local community for parties and neighbourhood fun days.
There are some relatively simple mechanics involved which are incorporated into this design so all you need to do is build it from the plans and it will work fine.I had originally planned on making a trebuchet but it flings way too far for my small yard.If you would like to know the minor changes to convert to a trebuchet just contact me.
MATERIALS
4 X 8' pvc pipe, 6 x short 90 degree elbows(elbows have 2 female ends), 5 x 3 way T junctions, 2 x 45 degree spigots(spigots have 1 male, 1 female end), 3 end caps, 3" bolt with nut, 2 washers, PVC cement.
CUTTING INSTRUCTIONS
1) Cut 6 42" pieces for the base and arm supports.I used my chop saw and it worked great but a hack saw will work fine too.Set the 3 12" leftovers aside as you will need them later
2) Cut 1 68" piece for the throwing arm.
3) From the 28" piece left over cut a 12" piece.
4) From the 16" piece left over cut 2 3" pieces.
5) Cut the remaining 10" piece in half.
ASSEMBLY
1) I recommend fitting it together without cement first and then do final cement after you have checked out the fit.One thing to remember if you want to keep the pivot hardware out of sight you will need to use a self tapping screws on that connection.The reason is so you can get access to the pivot hardware to tighten it if necessary.
2) Lay out the base first with the 3" piece between the T connectors,with the connectors pointing up 45 degrees.set the 12" pieces on other side of the T connector then fit the 90 degree elbows.
3) Place 42" pipe into corner 90 degree elbow on both sides.
4) Repeat step 2
5) Set the 4 42" pipes into the T connectors.
6) Drill the 68" throwing arm pipe 24" from the end.
7) Drill on the inward side of each 90 degree pivot elbow.
8) Set 45 degree spigots on 42" support arms.
9) Secure the throwing arm onto the 2 90 degree elbows with the nut,3" bolt and set the washers between the throwing arm and supports.
10) Attach the elbow/throwing arm assembly to the supports.
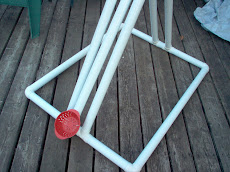
11) Attach the ammo basket with nylon ties. Set the basket at an fairly severe angle so the ammo will not fall out when the arm is in motion. Use an end cap here also.
12) Attach last T connector to throwing arm end then put the 2 5" pipe pieces in.It is important to cap the ends here because this is where the kids pull the throwing arm.
13) Grab a beer - Nice Job!
Free Counter